


In September 2024, I published an article about building a homelab on Nutanix CE in which I wrote that the first question to answer was the one about usage: throwaway virtual machines to build up skills, or services for yourself and your family? I answered “tests”, and I built my whole infrastructure around that answer.
Two years later, the answer has changed and the infrastructure has not moved an inch. Before starting the work, here is what my Nutanix homelab looked like on 1 July 2026.
My Nutanix homelab as of 1 July 2026
On that date, everything running at home sat on three machines. The network first, installed four years ago when the house was built and entirely Ubiquiti: a Dream Machine Pro, a USW Pro 24 PoE switch and a few Flex units spread across the rooms, all connected to a Freebox Delta on 10 Gb/s fibre.
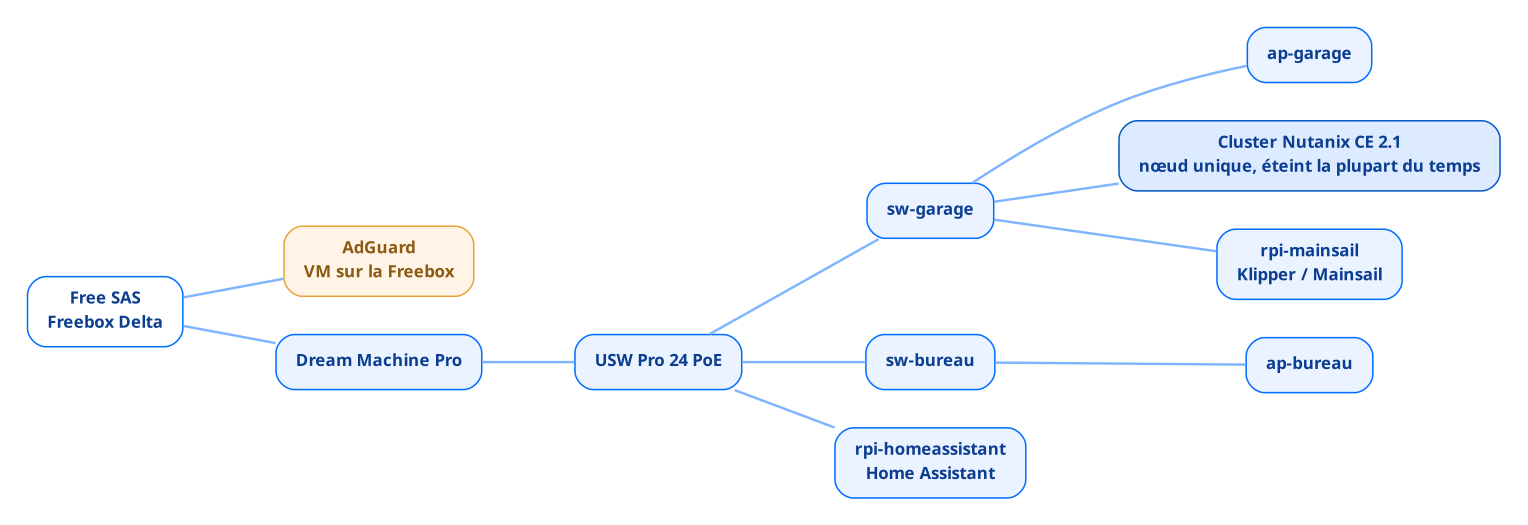
The cluster next, an Intel S2600WTTR chassis installed in the garage because it is not allowed inside the house, on sliding rails screwed straight into the joists for lack of a proper rack, a single node running Nutanix CE 2.1, with two or three test virtual machines on it. I described its hardware configuration back then, and I invite you to read my article on the subject.
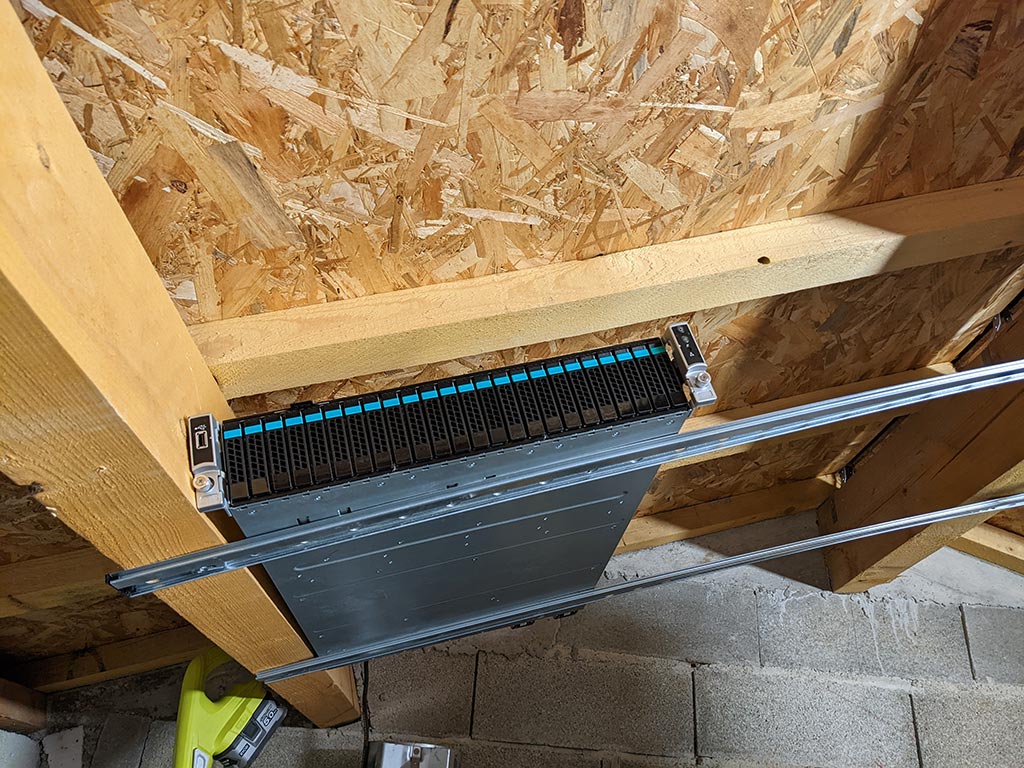
I recovered this 2016 server from a previous job. It had suffered a hardware failure and the administration did not want to pay for the repair, given its age and the infrastructure replacement already under way towards brand new Nutanix clusters. So I took it out and brought it back to life at my own expense.
Every other hardware decision follows from that starting point. Only one power supply connected out of two, on purpose, because nothing critical runs on it and a failure means at worst a cluster down for a weekend, then partial disk redundancy which I already accepted back then as a compromise. On sizing, however, I never hit the slightest limit: 384 GB of RAM, four 800 GB SAS SSDs and six 10k drives for two or three test virtual machines, headroom that served no purpose.
And that is all, or nearly. Two services live outside the cluster: Home Assistant on a Raspberry Pi, which already collects the consumption of the Meross plug connected to the server and the output of my photovoltaic installation, and AdGuard on a virtual machine hosted by the Freebox. DNS resolution for the entire house therefore relied on my ISP’s box: one slightly long reboot, one change of subscription, and nothing resolves any more.
What the network audit showed
Before touching the cluster, I went through the UniFi configuration in detail, on a version older than UniFi OS 5.1.33. The result is less flattering than the hardware.
The native network is 192.168.2.0/24 and carries VLAN ID 1 in the controller, a gap between naming and reality that stings as soon as you read your own configuration again six months later. Then four SSIDs, all on 2.4 GHz and all on WPA2, one of them hidden for the video surveillance, which has never protected anyone and mostly makes life harder for the devices that have to associate with it. The Tapo cameras, precisely, sit on Wi-Fi on that same native network: the devices I have the fewest guarantees about share the segment with everything else.
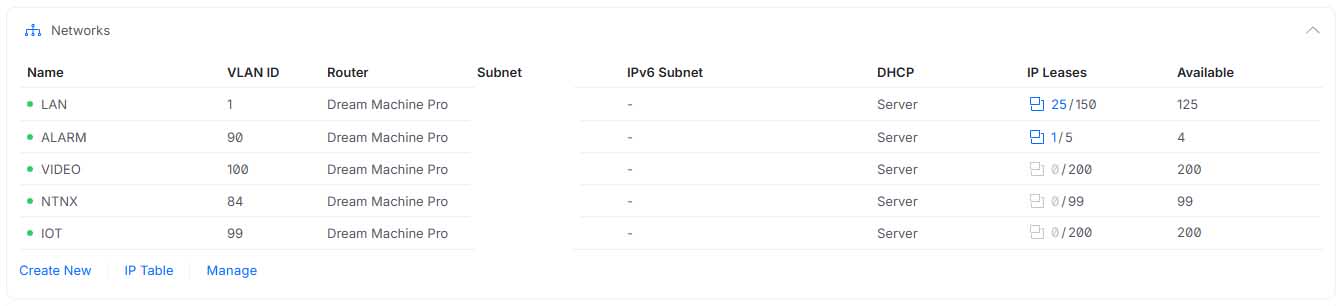
The inventory turned up the rest. Four VLANs declared next to the native one, ALARM on 192.168.90.0/29, VIDEO on 192.168.100.0/24, NTNX on 192.168.84.0/24 and IOT on 192.168.99.0/24, three of which have never handed out a single DHCP lease. Meanwhile twenty-five devices share the LAN, cameras included, while the VIDEO VLAN meant for them has been sitting there empty since day one.
That is what happens when you draw a segmentation on installation day and never read it again afterwards.
So there is no segmentation, only declared VLANs. And the reason is the same as for the cluster: my time went elsewhere.
What a Nutanix homelab costs when you only power it on demand
In 2024, I plugged a Meross smart plug into the cluster and fed it into Home Assistant to know exactly what this machine was costing me. Around 5,850 Wh per day with the cluster powered on, which projects to 2,138.9 kWh over a full year and close to 535 euros at the regulated tariff, assuming the server is on every single day of the year.
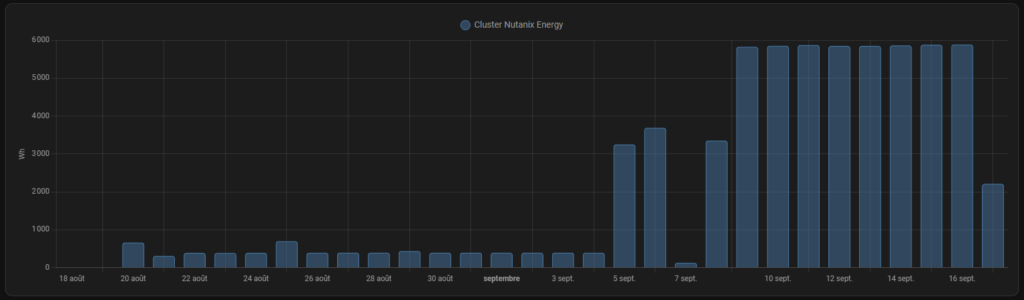
The number I was not expecting is the other one: with the server switched off, it still draws between 300 and 400 Wh per day, only to keep the IPMI and the power supplies alive. Over a year that is 110 to 146 kWh and around thirty euros for a machine that does nothing. The details of the measurement are in the article I wrote on the subject.
The rule imposed itself: the cluster only powers on for tests and for writing articles. And that is exactly what blocks everything else, since an infrastructure you boot on the evening you need it cannot host any service that has to answer around the clock, which rules out pretty much everything a house expects from a server.
I left things as they were for two years because I had other projects on my plate.
What did not exist
On 1 July 2026, I had no internal DNS, no reverse proxy, no monitoring, no secrets management, and no backup system at all.
Each of those gaps is painless as long as the virtual machines are disposable. You reach a VM by its IP address because you only have three of them, you monitor nothing because an outage bothers nobody, and you do not back up what you plan to destroy at the end of the test.
Over time my needs changed, and today I want to run local applications that the whole family will use. The five gaps then show up all at once, because none of them is visible until something has to survive a reboot.
The only addition in two years: Mainsail
Between my 2024 article and today, one single thing has moved. In December 2025, I installed Klipper and Mainsail to drive my 3D printer, on a Raspberry Pi sitting next to it.
I did not even consider another option. AHV does not do USB passthrough, the Nutanix KB is clear on that, and the cluster spends most of its time powered off anyway. There is one avenue I am keeping for the rebuild, VirtualHere, which exposes a USB device over the network and presents it to a virtual machine without any hardware passthrough. I have not tested it yet.
The electricity bill ended up dictating the architecture, and for two years it produced the same decision every time a new need came up.
So there is the inventory. A test cluster switched off almost all the time, two Raspberry Pi boards hosting applications and an ISP box acting as a DNS server. It works, and it cannot carry anything more.
That is where the work starts. I need a base that stays on and stays frugal, a DNS and a reverse proxy that belong to me, verified backups, monitoring, somewhere to keep secrets… and a Nutanix cluster that goes back to what it is good at: breaking things. That is what I will be writing about in the articles to come.


