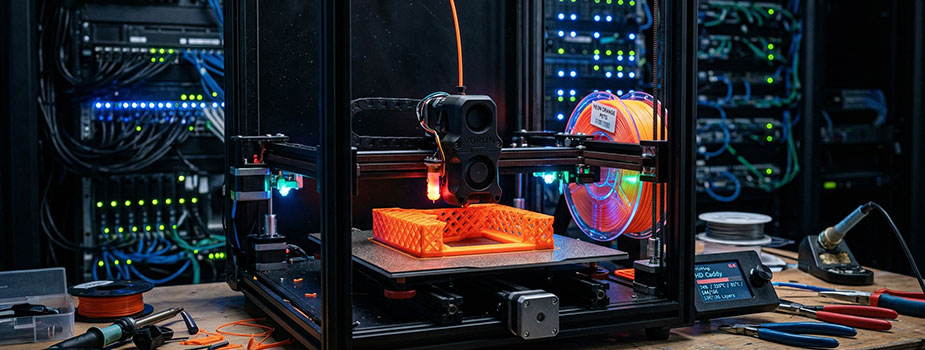
We’ve all experienced that moment of loneliness in our professional careers. The one where you’ve planned the perfect hardware upgrade for your infrastructure, but a trivial detail disrupts the whole operation. Recently, we had to replace the 3.5-inch mechanical drives in one of our 4-node clusters with 2.5-inch SSD drives. A classic maintenance operation to move from hybrid storage to full-flash and gain some IOPS.
The only problem, and a big one: the original server caddies weren’t compatible with this smaller form factor.
First approach: “official” adapters
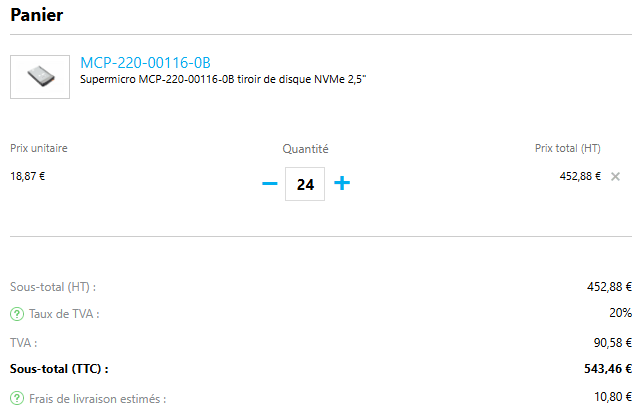
The obvious solution when managing a pro infra? Order official adapters or replacement caddies. We needed 24 pieces in total (6 drives for each of the 4 nodes). And then, reality hit hard.
Over 500 euros (including taxes and shipping).
But the worst part wasn’t actually the price: it was the lead time. Waiting several weeks when the project had to move forward? Unthinkable. Since I refused to pay this tax and wait, my 3D printer was going to take care of it.
Plan B: the DIY solution
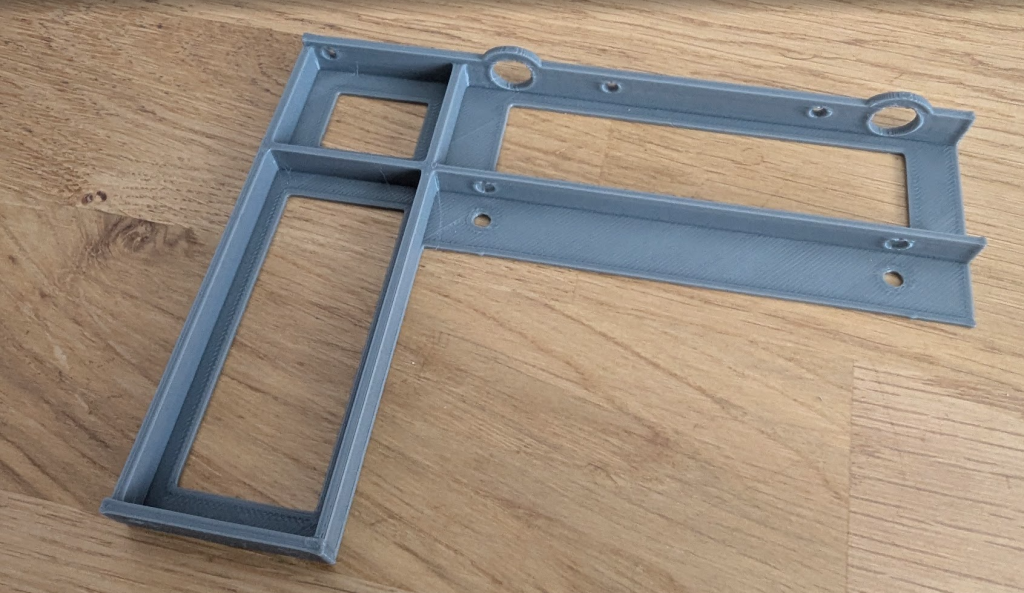
The advantage of having standard hardware like Supermicro is that you’re never the first to encounter a problem. No need to spend hours on Fusion 360 modeling the part to the nearest millimeter: the open-source community has probably already done it.
To ensure compatibility, I quickly printed one to validate the dimensions and make sure it did the job…
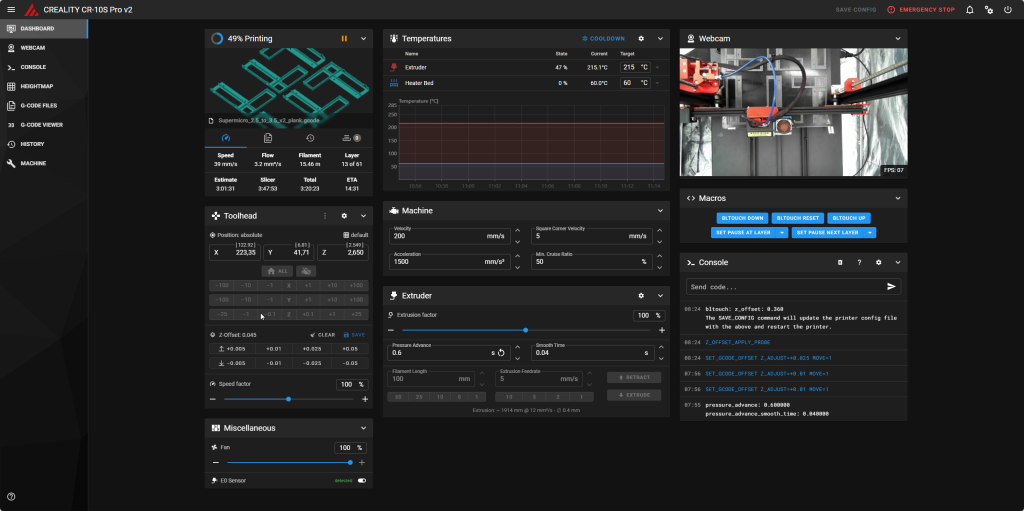
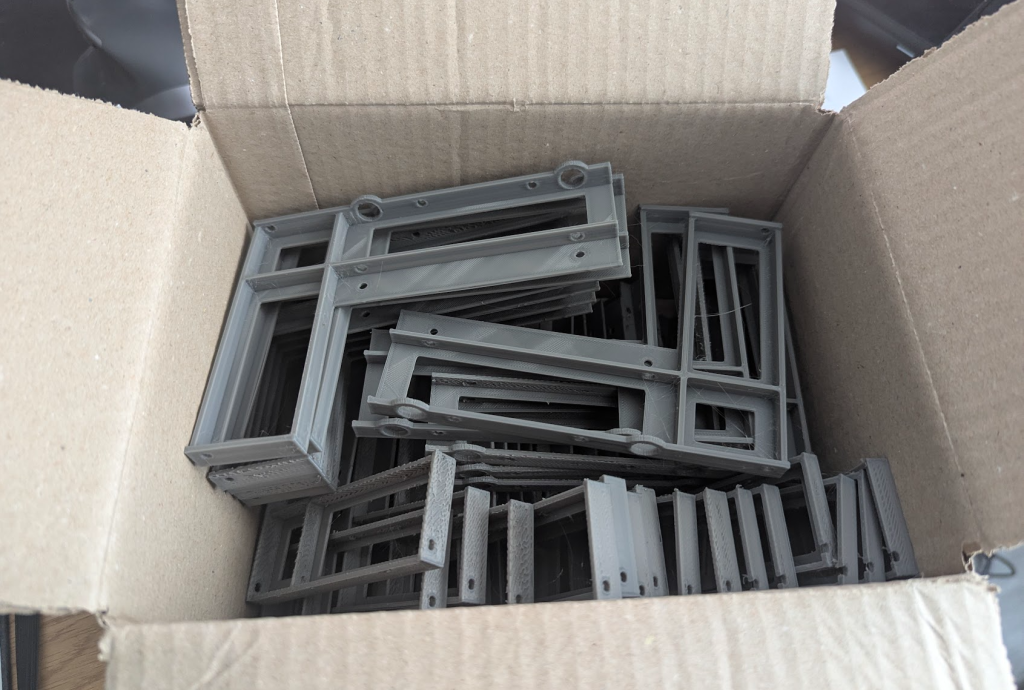
The next step: industrialization. I positioned my models so I could print 6 adapters at once. This meant leaving the printer running for about 7.5 hours for each build plate.
On my Creality CR-10S Pro v2 running Klipper, I was able to monitor the print job to ensure everything went as planned out of the corner of my eye while continuing to work on my projects.
Despite a slight hiccup during the first batch that forced me to do a bit of mechanical tweaking, the prints went perfectly well.
Maker Spirit for the Win!
The final verdict is clear:
Vendor Option: ~€543 and a 3-week wait.
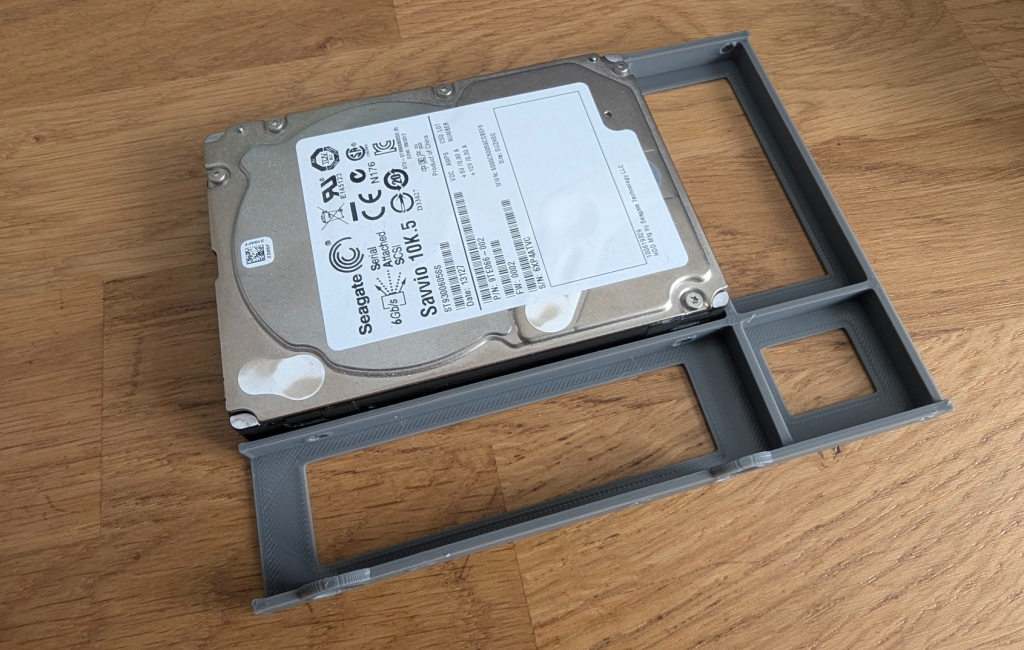
Maker Option: €20 of filament, a few kWh, and two solid days of printing.
Beyond the obvious financial savings (for the price of the official adapters, we could have bought the printer + the filament), the real lesson of this adventure is that the maker mindset allows you to transform a budgetary and temporal problem into a DIY solution that is 20 times cheaper and gets the job done in ultra-short timeframes.
So, the next time a problem rears its head, think “out-of-the-box” and, if need be, whip out your finest spool of filament.
If you read my previous article detailing the architecture and the technical stack I chose to deploy OpenClaw, you already know why I decided to run this solution on my Nutanix AHV cluster. Today, we’re getting practical! I will show you, step by step, how to deploy your own instance on a freshly installed Ubuntu virtual machine.
Before kicking off the hostilities, here is a quick reminder of my setup. I provisioned a VM on Nutanix AHV with:
8 vCPUs
32 GB of RAM
250 GB of storage
an NVIDIA Tesla P4 graphics card in PCI Passthrough
💡 Why favor full Passthrough over vGPU (virtual GPU)? Quite simply to guarantee near “bare-metal” inference performance. By giving our VM direct and exclusive access to the physical hardware, we completely eliminate the overhead (latency) associated with the virtualization layer.
Let’s start the deployment.
Preparing the Ubuntu VM: System and NVIDIA Drivers
The very first step is to prepare the ground to deploy our AI.
Ubuntu 24.04: Operating System Update
This is a rule I apply every single time I deploy a new operating system. As soon as I connect via SSH, I make sure all packages are up to date to avoid future security flaws or dependency conflicts.
sudo apt update && sudo apt upgrade -y
GPU: Installing NVIDIA Drivers
For OpenClaw to harness the computing power of my Tesla P4, the operating system must be able to communicate with it properly. Here are the commands to run to install the drivers (you can access a more detailed guide on the blog):
Once the machine has rebooted, we log back in and type the command to verify that our GPU is properly detected and ready to work:
nvidia-smi
Node.js and OpenClaw
Installing Node.js 22
OpenClaw is built on Node.js. To ensure we have a recent and efficient runtime environment (here version 22), we add the official NodeSource repository before launching the installation:
Once the installation is complete, the system automatically launches the configuration wizard for your instance. I will detail this step as well as the creation of API keys (Discord, Telegram, etc.) in a future blog post.
A small manipulation is required right after the OpenClaw installation if we want to be able to use “openclaw” commands without constraints. We need to add the local installation directory to our PATH environment variable (remember to adapt the username if you are not using administrateur):
💡 Why this manipulation? It’s an excellent security practice that I highly recommend. By exporting the PATH to ~/.npm-global/bin, we avoid installing global NPM packages with root (sudo) privileges. This significantly reduces attack surfaces and saves you from the eternal Linux permission conflicts!
Cleanly Exposing OpenClaw with Caddy
By default, the OpenClaw web interface listens on port 18789. Instead of attacking this port directly, I always prefer to place a reverse proxy in front of my applications. For this lab, my choice fell on Caddy.
sudo apt install -y caddy
💡 Why Caddy rather than Apache or Nginx? Because Caddy is formidably efficient. Where Nginx sometimes requires long configuration blocks for simple proxying, Caddy does the same job in literally three lines of code, all while being ultra-lightweight.
We edit its configuration file:
sudo vi /etc/caddy/Caddyfile
And we replace the entire content with the following instructions (replace the IP with the one of your VM, in my case 192.168.84.134):
192.168.84.134 {
    reverse_proxy 127.0.0.1:18789
}
Now, all that’s left is to restart the service so the proxy takes over:
sudo systemctl restart caddy
Network Security: Locking Down the OpenClaw Instance
Having a functional instance is good, securing it is essential. Even if you are on your local network (LAN), you should never leave open access to your control interface. We are going to apply a strict configuration via the OpenClaw CLI commands.
We start by restricting the Gateway listening to the local loopback to prevent any direct access:
openclaw config set gateway.bind loopback
We then force the operating mode to local, and activate token authentication (the bare minimum):
openclaw config set gateway.mode local
openclaw config set gateway.auth.mode token
Finally, since we are going through Caddy, we must authorize Cross-Origin requests (CORS) coming from our IP address, otherwise the browser will block the page (don’t forget to adapt the IP):
openclaw config set gateway.controlUi.allowedOrigins '["[https://192.168.84.134](https://192.168.84.134)"]'
We restart the service to apply our lockdown:
openclaw gateway restart
💡 The security pattern applied here is akin to local “Zero Trust”. By forcing OpenClaw on the loopback (127.0.0.1), we ensure that absolutely all traffic is forced to go through our Caddy proxy. Coupled with CORS filtering and authentication, we provide a baseline protection for our instance against potential scans or malicious scripts on the network.
First Contact and Configuration Validation
Retrieving the Access Token
Now that the doors are locked, we need the key. The authentication token was automatically generated during installation. We’re going to go fish it directly out of the JSON configuration file:
grep -i token ~/.openclaw/openclaw.json
Carefully copy this string of characters. Then open your browser and access your Web interface (e.g., https://192.168.84.134).
Enter the token in the “Gateway Token” box.
Device Approval
Once connected, you will notice that something is missing: the system is waiting for us to approve the “device” (the PC or tablet from which we wish to use OpenClaw) to grant it the right to process requests.
Return to your terminal to list the pending devices:
openclaw devices list
Locate your device ID in the list (a UUID-type string) and approve it:
💡 Device approval (devices approve) is much more than a simple interface formality. It’s a sort of cryptographic handshake. This mechanism guarantees that no unsolicited machine can attach itself to your OpenClaw cluster instance without your knowledge!
Interaction Tests
The OpenClaw instance is now 100% operational! To validate our entire stack, there’s nothing like a full-scale test. You can send a first prompt on the web interface’s integrated chat, or configure a bridge to send a message on the Discord side.
Conclusion
We went from a simple Ubuntu VM to a true secured inference server, powered by Node.js and accelerated by a dedicated NVIDIA Tesla P4 GPU via Nutanix AHV. The architecture is clean, secured behind a Caddy proxy, and ready to handle our requests.
But this is only the beginning. In upcoming articles, we will go even further: I will show you how to configure OpenClaw via the startup wizard, deploy local models via Ollama, create an interactive Discord bot, and even inject Google API keys to equip our AI with search capabilities. Stay tuned!
If you follow my ramblings on the blog, you know I love tinkering with my clusters and testing somewhat out-of-the-box stuff (cf. my Steamdeck articles for example). Recently, I had a thought: Gemini or Claude in the public cloud is great for coding a Python script or writing emails. But when it comes to asking it to interact with our local infrastructure, that’s where it gets stuck.
So I wondered how I could connect artificial intelligence closer to my VMs. With this in mind, I got my hands on OpenClaw. Honestly, it was a bit of an obstacle course at the start. No more simple conversational gadgets, here we are talking about deploying a true Private AI on a Nutanix AHV cluster capable of acting on our infrastructure. Let me present the tech stack I chose for this experiment.
What is OpenClaw?
For those who have been living in a cave these past few months, OpenClaw is a GitHub project that exceeded 300k stars in just a few months. Imagine an ultra-intelligent thought translator coupled with a butler. Instead of clicking through dozens of menus in a complex interface, you simply ask your infrastructure to work for you in natural language (via a universal web interface or even messaging apps like WhatsApp and Telegram). It is even capable of working on its own while you sleep!
But where it gets exciting for us engineers is under the hood. OpenClaw is not just another “stateless” Large Language Model (LLM) that forgets everything with each new request. It is a true Agentic Gateway. Concretely, this means it orchestrates autonomous agents equipped with tools. These agents can be configured to tap directly into our cluster’s private APIs (like the REST APIs of Prism Element or Prism Central), code, browse the web, and synthesize certain information. In short, we don’t just ask the AI questions anymore, we delegate tasks to it.
Why Self-hosted?
In the field, the question of data governance arises the second the word “AI” is pronounced. Out of the question to send sensitive information to servers over which I have no control!
Choosing the Self-hosted route with OpenClaw means taking back absolute control. Data flows, execution logs, and API credentials stay locked down warm and safe on my network, isolated from the internet if desired.
Architecture and Tech Stack
For this project, a simple “Next, Next, Finish” on the corner of a table was out of the question. Here is the robust technical architecture I ended up validating for my deployment.
The Foundation: Nutanix AHV & Ubuntu 24.04 LTS
To run this beast, you need solid foundations. I provisioned a virtual machine running Ubuntu 24.04 LTS hosted directly on my Nutanix AHV cluster.
On the sizing side, I went with 8 vCPUs, 32 GB of RAM, and 250 GB of dedicated storage. You might tell me: “32 GB for a gateway, isn’t that a bit too much?” The gateway will have to ingest substantial data streams, maintain the cache of the various active agents, and potentially handle heavy parallel API querying. And besides, I can allocate these resources in my lab, so why deprive myself?
The Application Engine: NodeJS 22
At the heart of OpenClaw, the magic happens thanks to NodeJS 22. It is the execution engine that runs the gateway and its AI agent integrations.
Why is Node 22 an excellent architectural choice here? For its asynchronous management (Event Loop). When you ask OpenClaw to do a status report on 50 VMs, the gateway will initiate multiple API calls to Prism Central while keeping your WebSocket stream open to reply in real-time in the chat interface. NodeJS excels in this non-blocking concurrency management.
Network Routing: Caddy
The usual operating mode for OpenClaw is to deploy it locally on the machine from which you will connect to it, or to set up a tunnel to access the remote instance. Let’s not lie to ourselves, I wanted to type the IP in my browser and be able to access my instance, whether I’m on my PC or my tablet.
To make this possible, I use a Caddy Reverse Proxy. Caddy manages traffic routing and HTTPS encryption fully automatically.
I can already hear you saying: “Yes, but if a guy connects to your local network, he will have access to your instance!”. Well no! Because OpenClaw natively integrates a Device Whitelisting system. If your PC has never been connected to the instance, you will have to provide the “Gateway Token”. Then, you will have to accept this new connection on the OpenClaw instance side. As you can see, only previously authorized devices can enjoy your local instance.
The Entry Point: Discord
The choice of entry point, which will allow you to interact with OpenClaw, is often a matter of taste and colors.
OpenClaw directly integrates a chat system so you can talk to it. It’s good, it’s native, but inaccessible if I’m not at home. The system also offers to configure external entry points like Telegram, WhatsApp, Discord, or even Teams and Slack. And that is clearly a big plus because it gives almost unlimited possibilities!
What’s Next?
The goal of this article was to present the architecture envisioned for my OpenClaw assistant, to understand what we are deploying and why. We therefore have a coherent technical stack, performant thanks to Nutanix AHV, and hosted locally.
In a future article, I will explain how to install OpenClaw step by step until you have a functional instance.
AI-assisted coding, for a complete novice in development like me, is a revolution. It allows me to turn ideas into reality in a few hours where it would have been impossible before. But this speed comes at a price we too often overlook: technical debt.
The Development Context
Recently, as I mentioned here, I developed a small web application named HYCU Upgrade Path. The concept is simple: a clean interface to generate and visualize the upgrade path from version A to version B of backup software.
To do this, I used Lovable, a “no-code/low-code” solution that allowed me to get the application online in a few days.
A few weeks later, I decided to rebuild the application using Gemini, Google’s multimodal IA, to see what it was capable of.
I gave similar instructions to both AIs. I expected a functional and similar result from both sides. What I didn’t foresee was the abysmal gap in the code structure… And the time spent.
We’re talking about a difference of 628kb versus 115kb. We’re talking about going from 79 files to 21 files. We’re talking about one week versus half a day. A chasm.
The Lovable Experience
On paper, Lovable sells a dream: you describe, it displays. And it’s true, the user experience is stunningly fluid. I described my need for HYCU Upgrade Path, and in a few iterations, the application was running before my eyes. Visually, it was clean with a few adjustments needed. Functionally, it was a bit more shaky.
I’m not a developer, but my first reflex was to check the generated repository. And there… it was a rude awakening.
For an application as simple as an upgrade path generator, Lovable spawned a veritable Rube Goldberg machine:
79 files created.
8 nested folders.
A total weight of 628kb.
Lovable fragmented the application into a myriad of tiny atomic components, generated duplicate configuration files, and imported libraries “just in case”. Looking at the components/ui folder, I found 38 files! Accordions, badges, carousels, “toasters”… when my app uses only a fraction of all that.
This is the “Black Box” approach: as long as it works on the surface, no one cares about the elegance of the engine. The result is a heavy application that is difficult to maintain over time. And for me, that’s a first red flag.
Regarding code modification through iteration, I didn’t find it very precise. I was forced to move forward in very small steps, which lengthened the development time… An iteration a bit too bold? It broke my interface half the time or gave a result that wasn’t what I expected. In short, not hyper-satisfied with the experience, although I managed to reach my goal in a short week of discussions.
The Gemini Experience: The Software Architect
After this week of struggle and a few weeks in production, I tried the same experiment with Gemini. Same prompt, same need, just “to see” what Google’s AI was capable of.
The result? At first, I thought pieces were missing.
21 files in total.
5 folders.
115kb on the scale.
Development time: half a day.
Gemini adopted a radically different, much more mature approach. Instead of importing a massive graphic library, it structured the code and kept only what was truly necessary.
Opening the src/components folder, the difference is glaring: 7 files, all essential. No noise, no useless components.
Even more impressive, Gemini provided me with a “Production Ready” architecture. Where Lovable gave me a messy frontend, Gemini cleanly separated the frontend from the backend, and even generated a docker-compose.yml and a deployment script (deploy.sh) for my VPS. It didn’t just code the interface; it thought about how I would run it, complete with a nice README.md.
The Technical Match: Obesity vs Efficiency
Let’s compare apples to apples. Here is the scorecard for the same functionality:
Metric
Lovable (The Factory)
Gemini (The Architect)
Gain
Project Weight
628 kb
115 kb
-82%
File Count
79
21
-73%
Philosophy
Full UI Kit (“just in case”)
Clean, readable code
Easier Maintenance
Architecture
Monolithic Frontend
Dockerized (Front + Back)
Ready to Deploy
Dev Time
1 week
1/2 day
Productivity x10
Why “cleanliness” matters (even for non-devs like me)
You might tell me: “We don’t care about the code or the number of files as long as the app works!”. That is a mistake.
Maintenance: Manually modifying the project created under Lovable is like looking for a needle in a haystack of 79 files. With Gemini, every file has a name that describes actually what it does.
Consumption: 628kb of code to load for a mobile user is heavy. 115kb is almost instant.
Cognitive Load: When AI generates “messy” code, it has a harder time reading itself for subsequent iterations. That’s why Lovable “broke” the interface: it got lost in its own complexity.
Conclusion: The Choice of Tool Makes the Difference
My verdict is clear.
If you want to prototype an idea in 10 minutes to show your boss that “it moves”, Lovable creates a good illusion. It’s spectacular, it’s visual, it’s a beautiful tech demo.
But if you want to build a lasting application that you can evolve without breaking everything, Gemini is far more efficient in my eyes.
The ecosystem is evolving fast. I haven’t tested it yet, but a tool like Claude Code is probably capable of doing even better.
October 2023. The situation is tense: the price per kWh is skyrocketing, and my newsfeed is flooded with ads for solar panels promising “total autonomy” or “free energy.” Being naturally suspicious (and a bit of a geek), I took out my Excel spreadsheets before taking out my checkbook. I invested €13,900 for 6kWp of power. Two years later, with 17.4 MWh produced, was it worth it? Spoiler: real-life figures beat my simulations, but the devil is in the details.
1. The Genesis: Why Turn My Roof into a Power Plant?
You don’t wake up one morning deciding to drop nearly 14,000 euros (before subsidies) just to please the planet. It is a calculation. My goal was twofold: to secure part of my energy costs for the next 20 years and, let’s admit it, the technical pleasure of managing my own production.
The Context: Buying Electricity in Advance
For the neophyte, seeing this as an expense is a mistake. It is a pre-purchase. By installing panels, I decided to buy a stock of electricity at a fixed price (the cost of installation divided by future production) rather than renting this energy from a supplier whose rates are indexed to geopolitical crises I cannot control.
But be careful, for this calculation to work, you shouldn’t size the installation based on guesswork.
Consumption Analysis: The Essential Prerequisite
Before even contacting an installer, I audited my own home. Many make the mistake of looking at their annual global bill. That’s insufficient.
You need to understand when you consume.
Solar only produces during the day (no kidding). If 80% of your consumption happens at night (electric heating without inertia, nightlife), solar without batteries will be a financial failure.
I extracted my hourly data via the Enedis website (thanks to the Linky smart meter) to isolate my energy “background noise,” what we call the baseload.
This is the house’s incompressible consumption when “nothing” is on: fridge, internet box, VMC, standby devices. For me, this baseload justified a production base, but to reach profitability on 6kWp, I had to be able to shift my heavy consumers (Washing machine, Dishwasher, Water heater) to the daytime. It was this “load shifting” potential that validated the project.
2. The Technical Study: Choosing Without Getting Scammed
Once the need was validated, I had to choose the hardware. The solar market is a jungle where passionate artisans rub shoulders with eco-scammers. Here are my technical choices and, above all, why I made them.
Self-Consumption with Surplus Sale: The Logical Choice
I opted for the standard model: I consume what I produce first, and what I don’t consume is automatically injected into the grid and sold to EDF OA (Purchase Obligation).
In October 2023, this contract guaranteed a fixed feed-in tariff (around 13 cts/kWh) for 20 years. This is a major financial security that allows amortizing the installation even if I am not home to consume.
The Hardware: DualSun and Enphase, the French-American Couple
DualSun Panels (375 Wp): It’s a French brand (manufactured in Asia, let’s be honest, but French engineering). The “Half-Cut” technology (half-cells) allows better management of partial shading and reduces resistive losses. They are robust and aesthetically sober (black frame).
Micro-inverters vs Central Inverter: This was the big debate. I chose Enphase IQ8M micro-inverters.
Why the IQ8M?
Unlike a central inverter (like SMA or Fronius) which manages the entire string in series (if one panel fails or is shaded, the whole string drops), the micro-inverter manages each panel independently.
But why the IQ8M model? It is Enphase’s latest generation capable of creating a micro-grid (although I don’t use the “Sunlight Backup” mode without battery yet). The “M” suffix indicates an output power adapted to my 375Wp panels. With a peak output power of 330VA, the DC/AC ratio is 1.13, which is excellent for avoiding clipping while maximizing production in low light.
The “Plug & Play Kits” Parenthesis and the Efficiency Trap
Before signing my quote, I obviously looked at the “Plug & Play” kits found in DIY stores. On paper, it’s seductive: no craftsman, plug it into a socket, and you’re good to go. But for 6kWp, this solution was not viable, and one must warn against a frequent marketing mirage.
A 400W panel will never produce 400W if it is poorly oriented. Balcony kits, often placed vertically (90°) or with approximate tilt, lose a huge amount of efficiency compared to an optimized roof installation (generally 30-35°).
The trap is confusing Peak Power (what the panel can output in a lab) and Real Production (useful energy).
On many kits, the inverter is deliberately undersized (to respect the injection limit on a simple socket). You buy a 420Wp panel, but the micro-inverter caps at 350VA. This is called clipping. It’s not serious in itself, but it’s a net loss in the middle of summer. For my 6kWp project, I wanted total coherence between the capacity of the DualSun panels and that of the IQ8Ms to milk every available photon.
3. Installation and Commissioning (October 2023)
Once the hardware was validated, time for action. The installation took place in late October 2023.
Installing 16 panels is not trivial. You have to manage the layout on the roof, the routing of DC cables under the tiles, and the run down to the electrical panel. The advantage of Enphase micro-inverters here is safety: you don’t bring high-voltage DC current (dangerous in case of electric arc) down into the house, but directly 230V AC current.
On the administrative side, do not underestimate the delays. Between the prior declaration at the town hall (DP), the grid connection request to Enedis, and the Consuel inspection (mandatory to validate electrical safety before injecting), it is a journey that requires patience. In my case, everything was wrapped up for effective commissioning at the end of 2023.
4. Production and Monitoring: The Truth of Numbers (2024-2025)
This is where the geek takes over. After more than two years of perspective, I can look up from theoretical estimates to give you the reality of the field.
Monitoring Tools: Enphase Enlighten
To manage it all, I use the Envoy S-Metered gateway. Note the “Metered.” Unlike the standard version which only measures production, this one uses measurement toroids (current clamps) placed on the house’s main supply.
Result: I see what I produce, but more importantly what I consume and what I import/export in real-time.
Without this visibility, self-consumption is done blindly.
Gross Production: 17.4 MWh in Two Years!
Here is the data extracted from my tracking for an installed power of 6 kWp:
Year
Total Production
Performance Ratio (kWh/kWp)
2024
8.9 MWh
~1,483 kWh/kWp
2025
8.5 MWh
~1,416 kWh/kWp
Data Analysis:
Weather Variability: There is a production drop of about 4.5% between 2024 and 2025. This is normal. The sun is not an absolute constant from one year to another.
Redoubtable Efficiency: With a ratio approaching 1,500 kWh produced per kWp installed in 2024, my installation performs extremely well (the national average is often between 1100 and 1300 depending on the region). The DualSun + Enphase combination works wonders, aided by near-perfect orientation/tilt (33% tilt for a near due south orientation) and correct panel ventilation (which lose efficiency when they heat up too much).
Self-Consumption: The Sinews of War
Producing is good. Consuming is better (financially).
Self-consumption rate 2024: 46%
Self-consumption rate 2025: 44%
Concretely, this means that I directly consume about 45% of my production. The rest (55%) comes from the grid.
Despite my efforts (delayed start of machines, water heater during the day), I stagnate below the 50% mark. Why? Because in summer, days are long and production explodes (sometimes 40 kWh/day), far beyond the house’s needs. Without a physical battery or an electric vehicle to charge on the weekend, it is difficult to go higher on a 6kWp installation. This is where selling the surplus becomes vital for profitability.
5. The Time for Assessment: Profitability and Real ROI
Let’s talk cash. We hear everything and anything about solar profitability. Here are my real figures, bill in hand, unfiltered.
The Final Cost of the Operation
For a turnkey 6 kWp installation (hardware + labor + procedures), the bill amounted to:
Initial Investment: €13,900 incl. VAT
Self-consumption Bonus (State): – €2,000
FINAL REAL COST: €11,900
Scenario 1: My Reality (2023 Contract)
With a self-consumption rate of about 45% (the remaining 55% coming from the grid) and a surplus feed-in tariff fixed at €0.13/kWh (the rate in force at the time of my request), here is my average annual yield (based on an average of 8.7 MWh/year):
Bill Savings (Self-consumption):~3,915 kWh that I did not buy from EDF (base €0.25/kWh) = €978 in savings.
Surplus Sale (Injection):~4,785 kWh sold to EDF OA (€0.13/kWh) = €622 in income.
Total Annual Gain: ~€1,600
Return on Investment (ROI): €11,900 / €1,600 = 7.4 years.
Verdict: Amortization in less than 7 and a half years for hardware guaranteed for 20 or 25 years is an unbeatable financial investment, far superior to any savings account.
Scenario 2: If I Had to Do It Again Today (The 4-Cent Trap)
This is where my article should serve as a warning. The rules of the game have changed. Recently, the surplus feed-in tariff dropped drastically to around €0.04/kWh (depending on the quarter). Let’s redo the calculation with this new parameter, keeping the same installation:
Bill Savings: €978 (Unchanged).
Surplus Sale (New Tariff):~4,785 kWh * €0.04 = €191 (instead of €622!).
Total Annual Gain: ~€1,169
New ROI: €11,900 / €1,169 = 10.2 years.
This drop in the feed-in tariff upsets the strategy.
In 2023 (my case): Selling surplus was a pillar of profitability. I could afford to inject almost 60% of my production without too much pain.
Today: Selling at 4 cents covers almost nothing. The absolute priority is no longer to produce a lot, but to consume everything. This highlights the interest in virtual or physical batteries, which were economically unviable two years ago but, with such a low buyback rate, are becoming an option to seriously study to avoid “wasting” 60% of one’s production.
6. Conclusion
After more than two years, do I regret my €11,900? Absolutely not.
Producing 17.4 MWh of green energy from my roof is a daily satisfaction. Seeing my Linky meter display “0 VA” of consumption while the oven and washing machine are running is a pleasure one never tires of.
Technically, the DualSun / Enphase couple is of exemplary stability: no breakdowns, precise monitoring, production on target.
However, if you start today, do not blindly copy my economic model. Do your calculations with the current feed-in tariff. If you cannot shift your consumption to the daytime, the ROI risks drifting away. Solar remains profitable, but it now requires being even smarter about its management.
In the world of infrastructure, we know that every cluster must be monitored. We never launch a major update without checking the node status and ensuring redundancy. For our professional and personal lives, it should be the same.
2025 is coming to an end, and if I had to summarize this year, it wouldn’t be a simple hot migration, but a true architectural evolution, with a few production incidents. It’s time for a full Health Check. No filters, just data, infra, and feelings.
Here is my post-mortem audit of 2025 and my roadmap for 2026.
2025: Unfiltered Retrospective (The Health Check)
This year marked a critical turning point in my career: my first full year as a Team Lead, while remaining a Senior Consultant expert in hyperconverged infrastructures at a Nutanix Pure Player: Mikadolabs.
From Technical Expert to Team Lead
For the uninitiated, moving from “Senior Consultant” to “Team Lead” is a bit like moving from managing a single cluster to orchestrating an entire datacenter. The scale changes. We no longer just manage IOPS and latency, but humans and planning.
On paper, the blueprint was clear. In reality, execution requires constant vigilance.
Overall, the stack held up. The team delivered, and infrastructure projects were successfully completed. I learned to delegate operational tasks (sometimes painful for a purist) to focus on organization and process improvement. Seeing a team member skill up on complex subjects, not necessarily technical ones, thanks to my guidance brought me a different satisfaction, but just as powerful as resolving a critical outage.
Let’s be transparent: everything wasn’t smooth. The hardest part for an ultra-technical profile like mine is stepping away from the console.
I like getting my hands dirty, tuning performance, auditing clusters. Becoming a Team Lead meant accepting spending less time on Prism Element or the command line, and more time in meetings or planning. I sometimes felt like I was losing my direct “connection” with tech, that imposter syndrome that stalks those who move away from production.
It’s a precarious balance that I continue to adjust for 2026: remaining one of the team’s expert references without becoming a bottleneck.
2025 in Data: Log Analysis
A good architect doesn’t rely on guesswork; they look at the metrics. And this year, if I hadn’t opened my dashboards, I would have had a totally biased view of my own performance.
That’s where data becomes relevant: it doesn’t lie, unlike our brain which tends to erase successes to focus on shortcomings.
The Blog: “Scale-Out” Growth
The traffic figures are quite good for a personal tech blog.
The KPIs of the year:
Production: 60 articles published (an average of 5 articles/month). Swiss clock regularity.
Traffic: 39.3k Views (+868%) and 23.8k Unique Visitors (+924%). Note: The growth figures compared to 2024 are a bit biased because the tool I used to track blog traffic changed in the last quarter of 2024.
Engagement: A community growing on LinkedIn that is starting to comment and interact, a sign that my content is finding its target.
We observe a direct correlation between publication density (especially the peaks in May and the regularity of the last quarter) and the explosion of organic traffic. It is proof by example that technical SEO, coupled with in-depth content (not simple ChatGPT articles), pays off over time. The blog has gone from “confidential” status to a true consulted resource. Many clients (not to say “all”) have already told me they read the blog regularly. Thank you, that’s what drives me to continue!
Sport: The Perception Bug
This is where the retrospective becomes surprising. If you had asked me yesterday: “Julien, were you athletic this year?”, I would have answered with frustration: “Yes, but not regular enough for my taste, I feel like I’ve stagnated”.
So I extracted the logs of my activities (Running and Cycling, thanks Strava) to see the extent of the damage. And there, surprise: the logs contradict my mental monitoring.
Activity
2024 (Baseline)
2025 (Prod)
Differential
Running
106 km
487 km
x 4.5
Cycling
444 km
1987 km
x 4.5
It’s a textbook case of a “False Positive”. My brain focused on the “off” weeks (only 2 weeks out of 52 with 0 activity), forgetting the global volume.
In reality, I multiplied my activity volume by 4.5 compared to 2024. I covered nearly 2500 km all sports combined. That’s not too bad, but I intend to do better in 2026!
The lesson for 2026? Trust the data. Like in prod, when you think there is a latency problem, you look at the curves first before rebooting. I wasn’t “irregular”, I simply changed scale without realizing it.
2026 Goals: My Tech Radar & Roadmap
A review is useless if it doesn’t allow updating the roadmap. For 2026, I don’t foresee a revolution, but a targeted evolution of my technical and personal stack. The goal? Reduce technical debt and prepare for the future.
1. Tech Watch: K8s and AI (Pragmatic)
There are two major subjects on which I intend to skill up, not out of “Hype”, but out of operational necessity:
Kubernetes (K8s): It has become unavoidable. Even in a hyperconverged world, container orchestration is the standard upper layer. It’s a subject I’ve put off for a long time, due to lack of time. So I want to learn the basics, and go beyond to master architecture and advanced troubleshooting.
AI (User & Integrator): I’m not talking about playing with prompts to generate images of cats or parody songs. My goal is twofold: optimize my daily workflow (AI as an assistant) and above all understand how to technically integrate it into solutions (API, automation). AI will not replace the architect, but the architect who uses AI will replace the one who doesn’t.
2. Side Project: Automated Audit
This is the big “Dev” chunk of the year. As a consultant, I spend a lot of time auditing infrastructures. I am working on developing an automated audit application.
The idea is simple: script intelligence and recurring checks to save time on data collection and focus on high value-added analysis. It’s a project that mixes my infra skills and my desire to code. Stay tuned, I’ll surely talk about it here again.
3. Human Infrastructure: Preventive Maintenance and MCO
Finally, let’s talk about my Hardware: my body.
The 2025 logs showed me that the machine is capable of handling the load, but the configuration will have to be optimized. My 2026 goal is to invest a little more in my health just as one invests in critical infrastructure:
More sport: Continue the momentum of 2025 to aim for absolute regularity and increase volume with more structured training.
Less stress: Better partition professional and personal life, and learn to pick my battles.
Healthy Food: Pay a little more attention to my diet to boost the benefits of physical activity.
My wishes for you: Be curious, be resilient
To conclude this first publication of 2026, I won’t settle for the usual formulas. In 2026, I wish you two essential qualities: Curiosity and Resilience.
Don’t be intimidated by the mountain. Computer science, like any field of expertise, is tamed step by step. Be curious, dare to test, dare to make mistakes. It is the only way to learn.
I also wish you Resilience. In our projects as in our lives, everything never goes exactly as planned on paper. There will be unforeseen events, errors, moments of fatigue. It’s okay.
True strength is not never falling, but knowing how to bounce back. Be lenient with yourselves when it doesn’t work on the first try. Accept the downtime, learn, and restart. That is true sustainable performance.
You might think that over time, you get used to it. That after two years, opening the email announcing the results becomes a mere administrative formality. Well, I must confess: not at all.
It is with immense pride – and undisguised relief – that I announce my nomination as a Nutanix Technology Champion (NTC) for the year 2026. This is the third consecutive year that I have the honor of joining this group of passionate experts.
To be completely transparent, I never take this distinction for granted. In the IT world, technologies evolve fast, and so do we. Staying relevant requires work, curiosity, and above all, the desire to share. Seeing my name once again on the official NTC 2026 list is a beautiful validation of the efforts put into the blog throughout the year.
What is an “NTC”? (Spoiler: It’s not just a LinkedIn badge)
I am often asked if it is an exam I passed, like an NCP-MCI certification. The answer is no, and that is precisely the beauty of this program.
The Nutanix Technology Champion program does not just reward passing a technical multiple-choice quiz. It is a distinction that recognizes community engagement. Basically, Nutanix spots those who spend their free time testing, breaking, fixing, and above all explaining their technologies to others. Whether through blog posts (like here), forum contributions, or talks at events.
For the purists, it is the equivalent of the vExpert at VMware or the MVP at Microsoft. It is the validation of what we call technical “Soft Skills”: the ability to evangelize a solution not because we are paid to do so, but because we master its intricacies and we love it. It is a recognition by peers and by the vendor, and that is what makes it so rewarding.
Under the Hood: Why this nomination matters for the blog
Beyond the shiny logo to put in a signature, being an NTC has a direct impact on the quality of what I can offer you on juliendumur.fr. It is not an honorary title devoid of meaning; it is a key that opens interesting doors.
Concretely, this status gives me privileged access behind the scenes. I have the opportunity to exchange directly with Product Managers and Nutanix engineering teams. This means that when I write a technical article, I can validate my hypotheses at the source, avoiding approximations.
Furthermore, we have access to roadmap briefings and Beta versions. Even if this information is often under NDA (I can’t reveal everything to you in advance!), it allows me to understand the direction the technology is taking. I can thus better anticipate topics to cover and offer you more relevant analyses as soon as features reach General Availability (GA). It is the assurance for you to read content that is not only technically accurate but also in phase with market reality.
Retrospective and 2026 Goals: Full Steam Ahead
This third nomination is the fruit of consistency. But above all, it marks the beginning of a new year of “lab”. The goal is not to collect stars, but to continue exploring the Nutanix Cloud Platform from every angle.
For 2026, I intend to keep offering practical tutorials and field feedback. While the AHV hypervisor remains the unavoidable foundation, I really want to move up the software stack a bit more this year. Expect to see topics covering container orchestration with NKP (Nutanix Kubernetes Platform), automation, and probably a stronger focus on security with Flow. The objective remains the same: dissecting the tech to make it accessible.
A huge thank you to the community for the daily exchanges, and of course to the NTC program team (shout out to Angelo Luciani) for their renewed trust. It is a pleasure to be part of this virtual family.
Now, the ball is also in your court: are there specific topics or features of the Nutanix ecosystem that you would like to see me cover this year? The comments are open!
I won’t lie to you: when you’ve had a taste of gold, bronze has a peculiar flavor. Last year, I had the immense pride of finishing first in the “Top Bloggers” ranking of the Nutanix Technology Champion (NTC) program.
This year, the verdict is in on the official community blog: I ranked 3rd.
Did I slow down? No. Did I share less? On the contrary. But in tech, just like in sports, staying at the top is often harder than getting there. This 3rd place is, above all, a signal that the competition has intensified. And honestly? It’s exactly what I needed to motivate me to get back in the fight for 2026.
The NTC Program is Not Just a Badge
For those new to the ecosystem, being a Nutanix Technology Champion (NTC) isn’t just about slapping a logo on your LinkedIn profile. It is a commitment. It means being part of a technical vanguard that tests, breaks, fixes, and—above all—documents Nutanix solutions. The “Top Blogger” ranking is the barometer of this activity.
1st in 2024, 3rd in 2025: Analyzing the Logs
So, what happened? I pulled my logs to compare. If my performance had dropped, I would have accepted this 3rd place with a shrug. But the data shows otherwise: my publication volume is equivalent to last year’s. Even better, my strategy was cleaner: instead of doing “bursts” (flurries of articles), I maintained a metronomic consistency, spread evenly over the 12 months.
The conclusion is simple and undeniable: the overall bar has been raised. My peers were absolute beasts this year. They produced more. This is excellent news for the Nutanix community: the ecosystem is alive, dense, and increasingly sharp. But for the competitor in me, it’s a wake-up call. Consistency is no longer enough; just like in cycling, I’m going to have to up the intensity.
Why Publish?
Beyond the rankings and the competition, why continue writing with such discipline? The answer is pragmatic. My blog is primarily my external memory. In our line of work, we don’t remember everything. We test, we configure, we hit a critical error, we resolve it… and six months later, we’ve forgotten how we did it. Blogging is about documenting my own “struggles” so I never have to look for the solution twice. It’s about transforming obscure troubleshooting into a clear tutorial. But make no mistake: every article is born from a real technical need, from a real infra that I built or fixed. No fluffy theory, just experience from the field. The icing on the cake: the feedback from our clients who stumble upon my blog and tell me, “We found a solution on your site.” That is the real reward.
Conclusion: See You at the Finish Line
Bravo to the two peers who finished ahead of me this year. You set the bar very high, and that is exactly what I like. The level of the NTC program is what makes it credible. But the message has been received. The consistency of 2025 was a good foundation, but for 2026, I’m shifting gears. I’m going to chase more specific topics, dig deeper into the guts of Nutanix AOS and AHV, and perhaps explore use cases that no one has documented yet.
The bronze medal is nice. But it will serve primarily as a reminder on my desk: next year, I’m aiming for the yellow jersey.
Behind this musical reference lies the annual event organized by Nutanix France: Nutanix .NEXT on Tour!
Nutanix .NEXT on Tour Paris
Like last year, Nutanix is once again organizing NEXT on Tour in Paris on October 2, 2025, at the CNIT La Défense.
The program for this day includes plenary sessions, keynotes, and feedback sessions. Some partners will also have a booth, providing the perfect opportunity for the publisher’s French customers to spend a full day engaging with hyperconverged infrastructure professionals.
Topics to be covered include:
Migration to Nutanix
Management and automation of your hybrid cloud with Nutanix Cloud Manager
As a Nutanix Pure Player, Mikadolabs will have a booth again this year at the show. I’ll be there for a good part of the day to welcome you and answer your questions about Nutanix and hyperconvergence with part of the team.
Don’t hesitate to stop by and say hello, and if you haven’t yet registered for the event, you can still do so via this link: Event Registration
Modifying all the site’s links so they display in a new window
Redesigning the footer
These are mostly small adjustments, but they’ve been something I’ve been putting off for a long time.
I’m also, and above all, taking advantage of this vacation to rest, do activities with family, sports, tidy up, do some DIY… Activities that give your mind a rest!
We use cookies to improve your experience on our site. By using our site, you consent to cookies.
This website uses cookies
Websites store cookies to enhance functionality and personalise your experience. You can manage your preferences, but blocking some cookies may impact site performance and services.
Essential cookies enable basic functions and are necessary for the proper function of the website.
Name
Description
Duration
Cookie Preferences
This cookie is used to store the user's cookie consent preferences.
30 days
These cookies are needed for adding comments on this website.
Name
Description
Duration
comment_author
Used to track the user across multiple sessions.
Session
comment_author_email
Used to track the user across multiple sessions.
Session
comment_author_url
Used to track the user across multiple sessions.
Session
Statistics cookies collect information anonymously. This information helps us understand how visitors use our website.
Matomo is an open-source web analytics platform that provides detailed insights into website traffic and user behavior.