I’ll be honest: a while ago, development and APIs weren’t exactly my cup of tea. My playground was the console, SSH, commands typed on the fly. But with the future (and inevitable) blocking of SSH access on Prism Element and Prism Central, I had no choice: I had to get serious about it. And if I’m going to dive into the world of Nutanix APIs from my Windows PC, I might as well do it with the right tools to avoid tearing my hair out. In this article, I’ll show you how I equipped myself with the perfect tools to query Nutanix APIs.
Why Optimize Your Windows Environment for APIs?
For years, my reflex as a sysadmin facing a complex or repetitive task on Nutanix was the same: open PuTTY, connect via SSH to a Controller VM (CVM), and run ncli or acli commands on the fly. It was fast, it was efficient.
But I’ll be direct: that era is over. Nutanix is making a major security shift. SSH access to clusters will be disabled in one of the upcoming releases, relegated to the simple rank of emergency access for support. The only sustainable, supported, and scalable method to interact with your infrastructure is the API. Whether it’s the v2 API to drive a local cluster via Prism Element, or the v3 APIs on Prism Central, API automation has become the norm.
The problem? Windows hasn’t historically been the best student for handling complex web requests in the command line. PowerShell has made huge progress with Invoke-RestMethod, but when it comes to testing, debugging, and formatting nested JSON, nothing beats a solid Linux foundation coupled with a graphical API client.
That’s where our two best allies come in: WSL (Windows Subsystem for Linux) for the power of the native command line, and Postman for visual exploration of Nutanix APIs. Let’s see how to put all this together.
Solution 1: The System Foundation with WSL (Windows Subsystem for Linux)
How to avoid tearing your hair out with the quotes of a curl command under the Windows command prompt (cmd) or fighting with character escaping under PowerShell? The most elegant and robust solution today is to use the Windows Subsystem for Linux (WSL).
Deploying WSL and Ubuntu in Minutes
The installation is ultra-simple on recent versions of Windows 10 and 11. Open a PowerShell console as an administrator and simply type this magic command:
wsl --install ubuntu
Then restart your PC. You now have a functional Ubuntu distribution, fully integrated into your Windows, without the heaviness of a classic virtual machine. It’s the perfect environment to run your future Bash or Python scripts targeting the Nutanix infrastructure.
Look for the “Ubuntu” icon in the Windows start menu to launch the command prompt on the subsystem.
The Essential Packages: curl and jq
Once in your new Ubuntu terminal, you are missing two vital tools to dialogue with REST APIs: curl (the standard for forging web requests) and jq (the absolute Swiss Army knife for manipulating, filtering, and formatting JSON responses). Install them with these command lines:
sudo apt update && sudo apt upgrade
sudo apt install curl jq -y
Why is jq so critical in our line of work? Let me share a concrete field situation with you. JSON responses returned by Prism Element or Prism Central are often extremely verbose. If I simply want to retrieve the unique identifier (UUID) of my cluster via the v2 API to use it in a script, without drowning in hundreds of lines of configuration, here is the exact command I use:
curl -k -u admin:MyPassword -X GET https://<YOUR_PRISM_ELEMENT_IP>:9440/api/nutanix/v2.0/cluster | jq '.cluster_uuid'
The -k parameter is crucial here: it ignores the SSL certificate warning (which is self-signed by default on Nutanix), and the | jq '.cluster_uuid' instantly filters the raw response to return only the targeted information (in the example below: "00064a67-579d-c757-5883-002590b8ef5a"). It’s clean, neat, and perfectly integrable into a variable to automate a deployment workflow, for example.
Solution 2: The Must-Have Graphical API Client: Postman
The command line is great for running production scripts. But when it comes to exploring a new API, testing the parameters of a complex request, or analyzing the structure of a 500-line JSON payload, I prefer a graphical interface. And in this area, Postman is perfectly suited. You can download and install it in seconds from their official website.
Configuring Your First Workspace
The first mistake I made when starting with the Nutanix API (and with Postman in general), is hardcoding my IP addresses, usernames, and passwords in every request. Never do that! Not only is it tedious if you switch clusters, but it’s especially a major risk of information leakage if you share your screen or your collections.
Postman offers a vital feature: Environments. Create a new environment (e.g., “Prod Cluster”) and define three variables in it:
cluster_ip: The IP address of your Prism Element or Prism Central.username: Your service account (avoid using the default admin account if possible).password: The associated password (to be configured as “Secret” type to hide it).
From now on, in your requests, you will no longer use the raw URL, but the call to variables between double curly braces: https://{{cluster_ip}}:9440/api/nutanix/v2.0/...
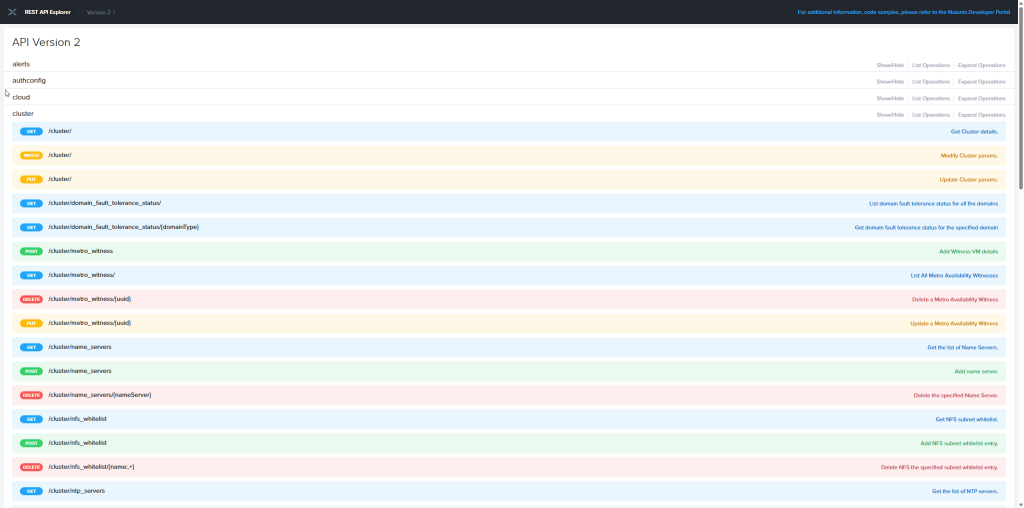
The Expert’s Trick: Importing the Prism Central Swagger
Here is my real “trick” to save you hours. Nutanix APIs, particularly the v3 APIs on Prism Central, are extremely vast. Rather than creating your GET, POST, or PUT requests one by one by laboriously reading the documentation on the Nutanix.dev portal, did you know that you could suck all the configuration directly from your own cluster?
The Prism Central API exposes its OpenAPI specification (Swagger). In Postman, click on the “File > Import” button in the top left menu, choose “Link”, and simply paste this URL (replacing the IP with your Prism Central’s IP): https://<PRISM_CENTRAL_IP>:9440/static/v3/swagger.json
Let the magic happen: Postman will query your cluster and automatically generate a complete Collection containing absolutely all possible v3 API requests, preformatted with the right headers and sample payloads. It’s a massive time saver for exploration!
Test: The First API Call from Postman
Now that the tooling is ready and my variables are configured, it’s time to make the first graphical request to the cluster to retrieve its global information.
Managing Authentication and Bypassing the SSL Trap
Create a new request in Postman (+ button or New > HTTP Request). Select the GET method and enter the following URL using our variable: https://{{cluster_ip}}:9440/api/nutanix/v2.0/cluster
Before clicking “Send”, we have two settings left to make:
- Authentication: Go to the Authorization tab, choose the Basic Auth type. In the Username and Password fields, type
{{username}} and {{password}} respectively. Postman will replace these values on the fly.
- The SSL Certificate: By default, Nutanix uses self-signed certificates. If you run the request now, Postman will block the call with a security error. Go to File > Settings (or the gear icon), General tab, and disable the “SSL certificate verification” option. This is the graphical equivalent of our
-k parameter in curl.
Click Send. If everything is green (Status 200 OK), you should see a beautiful formatted JSON appear at the bottom, containing your cluster’s UUID, its name, its AOS version, and its virtual addresses. Congratulations, your workstation is communicating with Nutanix!
Basic Auth vs JSESSIONID
If you are just starting out, the Basic Auth method (which sends your credentials with each request) is perfect. But beware: this method has an impact.
Why? Because every time you make an API call in Basic Auth, the CVM’s Acropolis service must validate your credentials with the authentication module (and often, these credentials will be linked to an Active Directory via LDAP). If you run a script that makes 500 requests in a row to inventory VMs, you will trigger 500 identity validations. This unnecessarily saturates the CVMs and your domain controllers.
The best practice if you script massively: Authenticate only once, and use session Cookies! When you make an initial authentication request or query the API, Nutanix sends you back a cookie named JSESSIONID. Postman stores it automatically and uses it for subsequent requests in your collection. In your future Bash/Python scripts, always remember to retrieve this cookie during the first call, and pass it in the Headers of your subsequent calls. You will drastically relieve the management plane of your cluster!
Conclusion: Security Reminder and Advanced Usage
All the tools are now in place to free myself as much as possible from SSH during my next troubleshooting sessions.
I must give a fundamental security reminder. Postman allows you to export your collections to share them with your colleagues or back them up. It’s great for teamwork. But beware: if you haven’t used environment variables as we saw earlier, and you typed your passwords “hardcoded” directly in the Authorization tab of your requests, they will be exported in clear text in the collection’s JSON file.
Always ensure your “Secrets” remain in your local Environment configuration (which, by default, does not export current values with the collection). I’ve seen too many admin passwords lying around on the network because of this!
Now, all I have to do is look into the scripting and automation part to be able to develop applications that will help me drive, audit, and configure my Nutanix clusters.
But that will be the subject of a future article! Until then, happy querying to all.